
Enable Single Sign-On for Atlassian Cloud with WSO2 Identity Server
Atlassian is an organization which makes products for software developers and companies. If you are someone whose in the tech industry, chances are that you have used at least one of their products. In this tutorial, I will be covering how to setup single sign-on (SSO) for Atlassian Cloud products with WSO2 Identity Server.
Prerequisites
Atlassian Cloud deliver’s a set of Atlassian products as cloud based services. Some of the notable services offered through Atlassian Cloud are;
- JIRA
- Confluence
- Bitbucket
- Trello
- Statuspage
The configurations steps in this tutorial is valid for enabling SSO for all these Atlassian cloud solutions. Now let’s have a look at how we can enable single sign-on with WSO2 Identity Server.
Atlassian cloud provides SSO support through it’s Identity & Security product — Atlassian Access and it allows to configure your own identity provider for SSO over SAML protocol. In order to configure SSO we will need a couple of things as prerequisites.
- Subscription to Atlassian Access
- A verified domain in Atlassian Access — https://confluence.atlassian.com/cloud/verify-a-domain-for-your-organization-873871234.html
- A WSO2 Identity Server setup — For this tutorial, I’ve used Identity Server 5.11.0. But the steps can be used with previous Identity Server versions as well.
Apart from the above prerequisites, Atlassian provides following recommendations prior to setting up SSO.
- Do the communication between Atlassian and the identity provider (WSO2 Identity Server in this case) over HTTPS.
- Make sure to time sync your identity server node using NTP. This is basically to make sure the issued SAML token is not prematurely expire or vice versa due to incorrect time settings in you server node.
- Create an Atlassian account which can access your Atlassian admin portal even if SAML has been misconfigured.
- The account shouldn’t use an email address from the domain which you have verified.
- The account should have site admin and organization admin access.
More information on this at Atlassian official document.
Configuring Atlassian Cloud
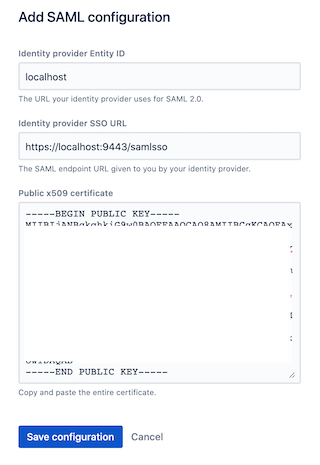
- In the Atlassian Admin portal, go to
Securitysection and click onSAML single sign-on. - Then click on
Add SAML configuration.

- To complete the SAML configurations, you will need the following values related to your identity server deployment
- Identity provider Entity ID — This is the identifier of the identity server used by Atlassian, typically sent in the SAML response as the Issuer. The corresponding Entity ID value can be found in Resident IDP section of Identity Server management console under Inbound Authentication Configuration > SAML2 Web SSO Configuration. Since I'm running Identity Server locally, I'm using the default values in the product.

- Identity provider SSO URL — This is the SAML endpoint of the Identity Server. Typically this URL will look like https://<idp.host>/samlsso or https://localhost:9443/samlsso?tenantDomain=<tenant-name> if it's for Identity Server tenant. Atlassian doesn't accept localhost URLs for this field. So if you are running the server locally, provide a URL with a dummy DNS name and add a host mapping for that domain.
- Public x509 certificate — This is the public certificate of the signing keys used by the to sign the SAML Assertion issued by the Identity Server. If you are configuring the Identity Server in a super tenant, you can navigate to <IS_HOME>/repository/resources/security and execute the following keytool command to export the public certificate in PEM formate;keytool -export -alias wso2carbon -keystore wso2carbon.jks -file public-cert.pem (default keystore password: wso2carbon). The abovose command is for the IS server with default settings, so change the parameters as necessary to suite your setup.
If you are configuring the Identity Server in tenant mode, you can download the public certificate from the tenant's management console under Keystores > List menu. However, note that the downloaded certificate is in DER format and should be converted to PEM format. See https://www.sslshopper.com/ssl-converter.html for more information.
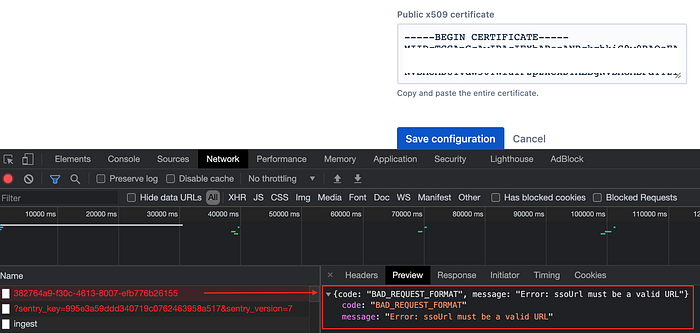
- Click on
Save configurationonce the values are added. Refer the Atlassian official document for more info. In case if you get an error while saving the configurations, you can try checking the browser network tab to see the status of save operation.
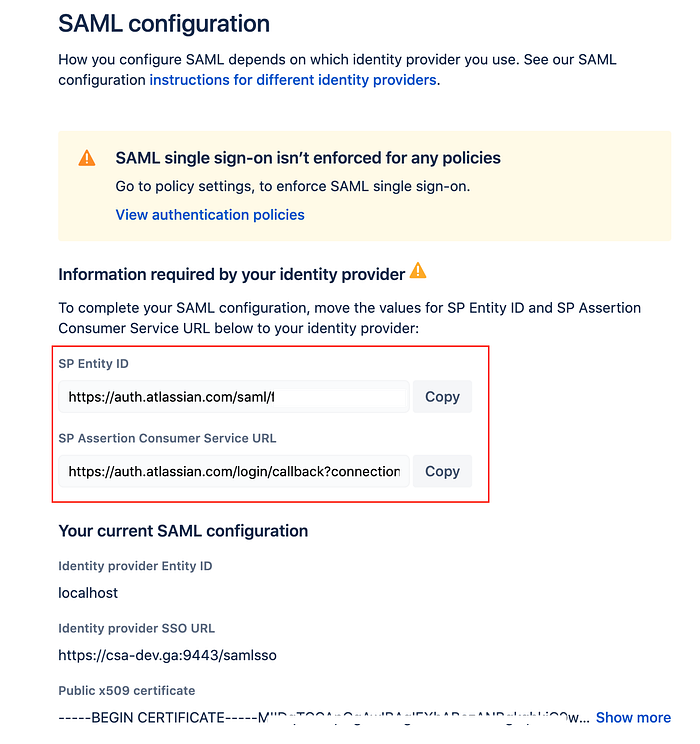
- Once the configurations are saved you will notice a set of configurations (
SP Entity IDandSP Assertion Consumer Service URL) required to configure the Identity Server. We will use these details in the coming steps.
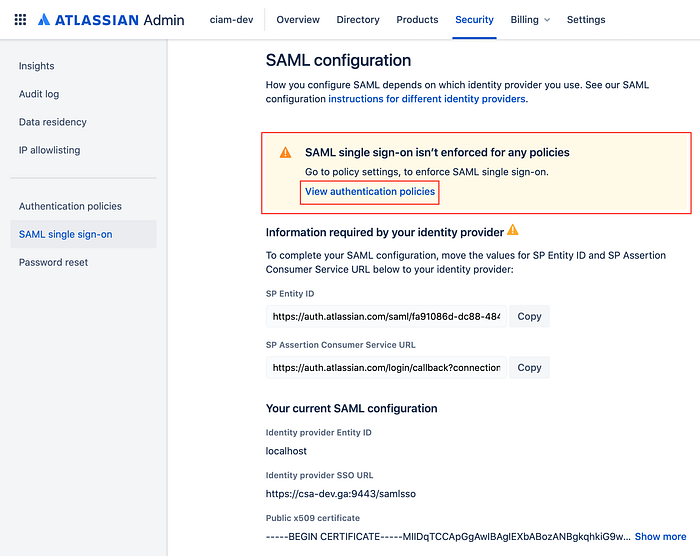
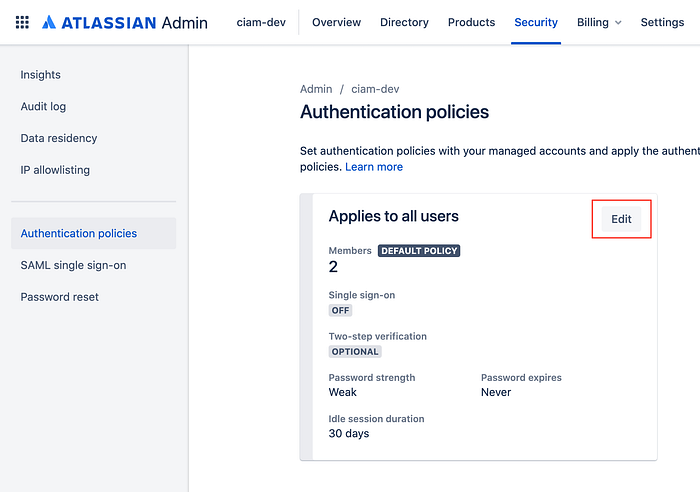
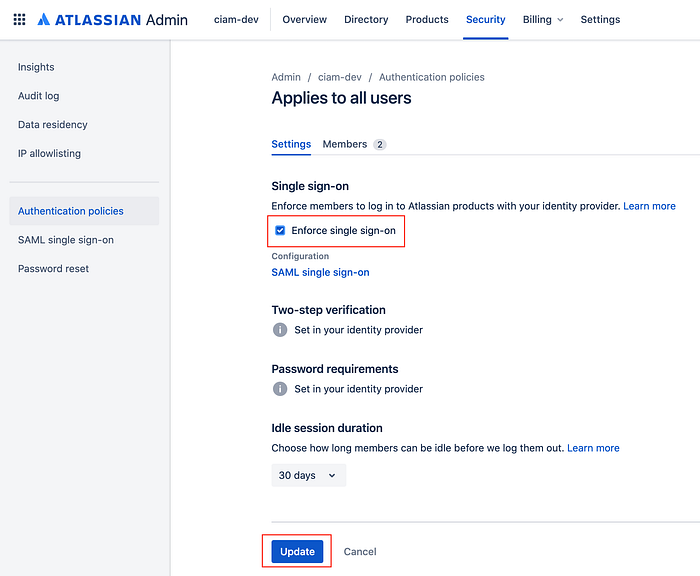
- Next we need to enable SAML single sign-on for Atlassian products. For that, click on
View authentication policies, edit theDEFAULTauthentication policy and checkEnforce single sign-onoption.
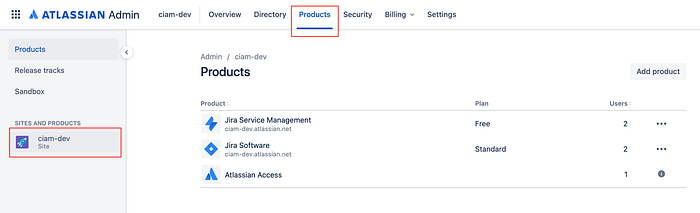
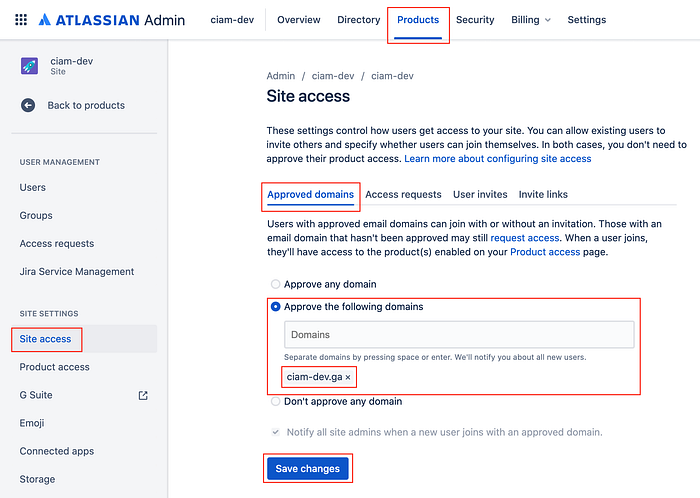
- Next, from the
Productssection, select your Atlassian site or product, and navigate toSite Access > Approved domainssection and set your verified domain as an approved domain. This will allow access to your Atlassian products for the users logging in with an email address of your verified domain.
- Once the above configuration is saved, we can move on to configuring the Identity Server.
Configuring WSO2 Identity Server
- Login to the management console as a super tenant or a tenant user.
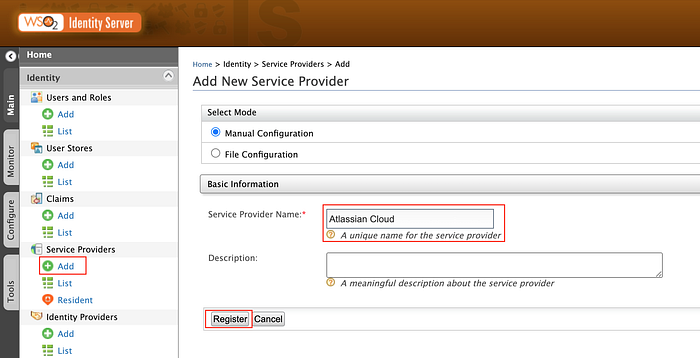
- Next, add the Atlassian Cloud as service provider form
Service Provers > Addmenu. Fill the basic information andRegisterthe service provider.
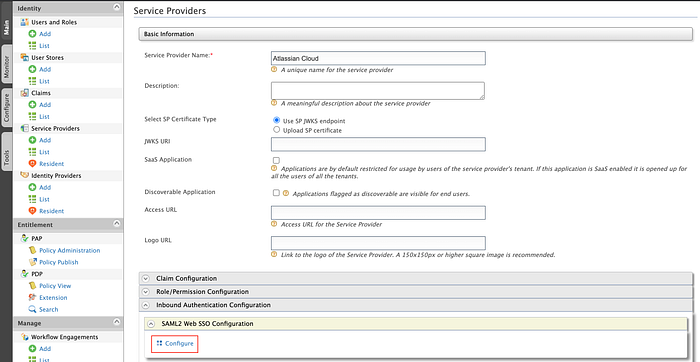
- Next, set the SAML configurations required for the authentication. Expand the
Inbound Authentication Configuration > SAML2 Web SSO Configurationsection and click onConfigure.
- Set up the below SAML configurations and complete the registration.
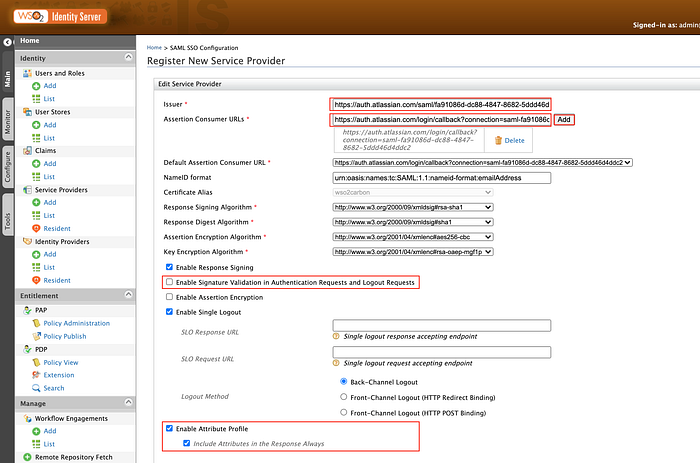
- Issuer —
SP Entity IDobtained from Atlassian side in the previous section. This value is used by the Identity Server to identify requests from Atlassian. - Assertion Consumer URLs —
SP Assertion Consumer Service URLobtained from Atlassian side in the previous section. Upon authentication, the SAML assertion will be sent to this URL. - Disable Signature Validation in Authentication Requests and Logout Requests — This is needed because the SAML authentication request sent by Atlassian is not signed.
- Enable Attribute Profile — This is needed to send the user attributes required for Atlassian during authentication.
- Next, configure the attributes required by the Atlassian for authentication.

- Expand the
Claim Configurationsection in the service provider settings - Select
Define Custom Claim Dialectto translate the WSO2 attribute identifiers to Atlassian attribute identifiers. Following are the required attributes by Atlassian. (Copy-friendly text can be found here)

- Enable
Requested ClaimandMandatory Claimfor all the attribute entries. This will enforce Identity Server to send the selected claims in the SAML response. - Set
emailattribute as theSubject Claim URI. - Once the above changes are done,
Updatethe service provider. - More on the Atlassian attribute requirements can be found at Atlassian official documentation.
Testing the Integration
Above are all that is required to successfully configure single sign-on with WSO2 Identity Server. Next we will test the integration.
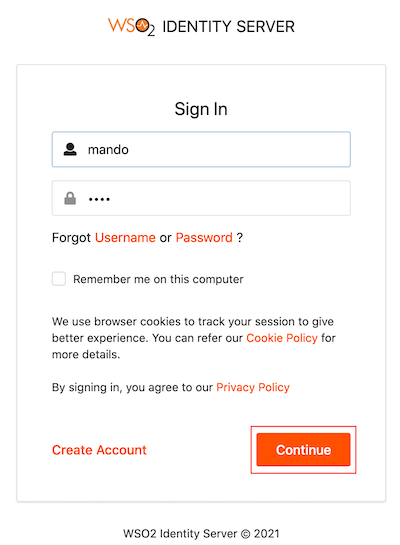
- Access you Atlassian organization URL ex:
https://ciam-dev.atlassian.net/ - You will be prompted to enter the username for authentication. Enter the email of the user. Note the email domain should match the domain we verified in Atlassian.
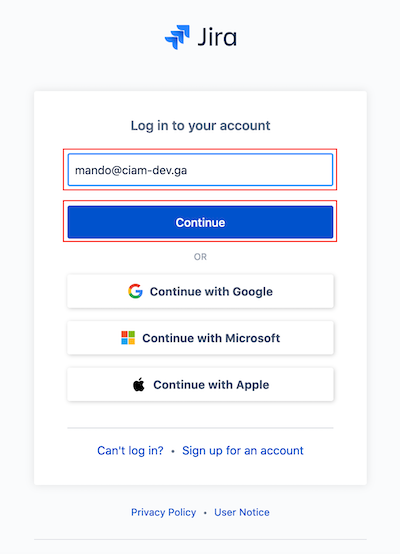
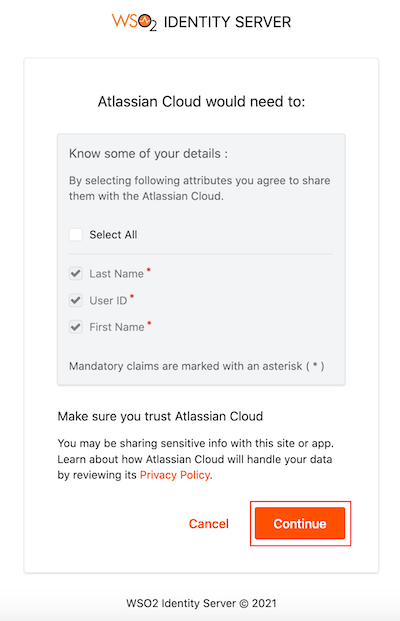
- Note that you are being redirected to WSO2 Identity Server for authentication. Authenticate with one of the users in the system and provide consent to share attributes with Atlassian.
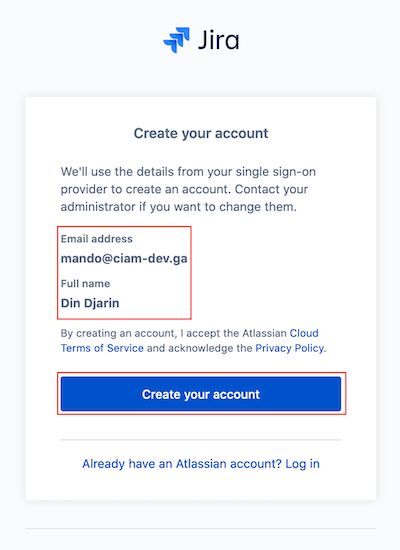
- After successful authentication, you will be redirected to Atlassian and since this is the first time we are authenticating with this user, Atlassian will prompt to provision the authenticated user in Atlassian.
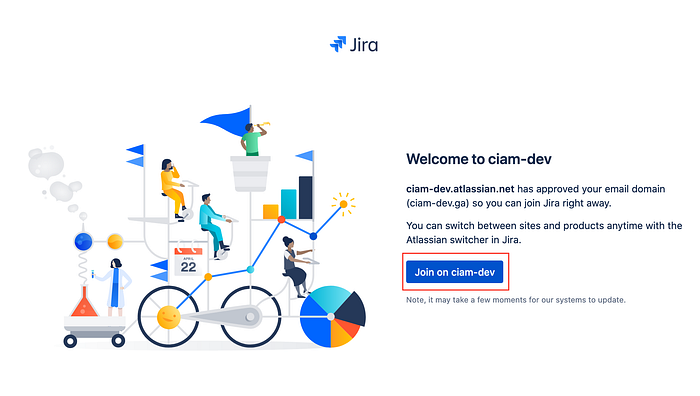
- Next you will get redirected to a page where you will be requested to join the Atlassian organization and consume the services. You should be able to access the Atlassian service once the request is accepted.
Note: If you run in to any errors during the authentication, it’s best to check the SAML requests and responses exchanged between the servers to get clue on what might have gone wrong. Also, if the error is coming from WSO2 side, check the Identity Server logs for errors.
With that, we have reached to the end of this tutorial. Since WSO2 Identity Server is a full-fledge Identity and Access Management solution you can achieve much more complex authentication and authorization functionalities to cater your orgnization’s access management requirements. Visit https://wso2.com/identity-and-access-management/features/ to see what more you can get with WSO2 Identity Server.

